Last update at :2024-01-04,Edit by888u
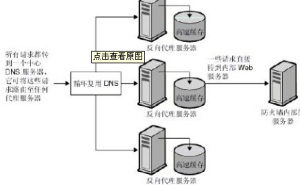
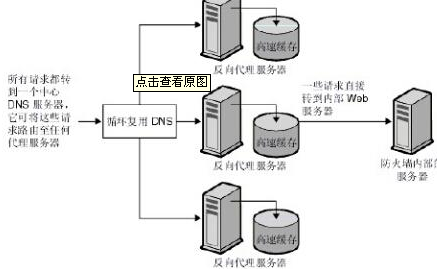
VpsAdd tutorial: Nginx (LNMP) Reverse proxy configuration tutorial The reverse proxy method refers to using a proxy server to accept connection requests on the Internet, then forwarding the requests to the server on the internal network, and returning the results obtained from the server to the client requesting a connection on the Internet. At this time, the proxy server appears as a server to the outside world. By placing reverse proxy node servers throughout the network to form a layer of intelligent virtual network based on the existing Internet, the CDN system can real-time analyze the network traffic and the connection, load status of each node, and the distance to the user. And comprehensive information such as response time redirects the user's request to the service node closest to the user.
When talking about how to configure the reverse proxy under Nginx, let us first understand what a reverse proxy is. A reverse proxy uses a proxy server to accept Internet connection requests, and then forwards the requests to another server.
Originally, I have never used a reverse proxy, so I have never done it. Just a few days ago, a space on EWSIDC was not allowed to be bound due to a problem with the domain name (imzhaorong.com) BA. You can only bind it through Third-level domain name access provided by the system. But I still want to use the original top-level domain name to access the content of this space. What should I do? Use your VPS as a reverse proxy. Below, let’s look at the detailed process.
First, let’s talk about the general environment. The unBA top-level domain name I use is imzhaorong.com, the third-level domain name provided by EWSIDC is 1e01f.wi.ipc.la, and the VPS I use is Host1Plus’s $1 cloud VPS, which has LNMP installed.
First, we need to resolve the A record of the domain name our.com to the IP address of the VPS;
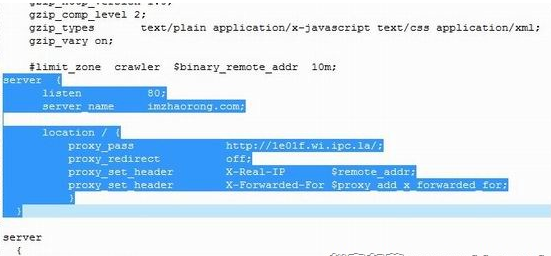
Then, modify the nginx configuration file. In this tutorial, we download nginx.conf of VPS to local modification (the file directory is located in /usr/local/nginx/conf/). Let me take a screenshot first:
The blue part in the picture is the code we added. The reason why I am superfluous to the previous picture is mainly to draw attention to the location of adding the code. I got it wrong before. Fortunately, my brother gave me some advice. Next, I will explain it again. Paste the code:
server { listen 80; server_name we.com;
location / { proxy_pass http://1e01f.wi.ipc.la/; proxy_redirect off; proxy_set_header X-Real-IP $remote_addr; proxy_set_header X-Forwarded-For $proxy_add_x_forwarded_for; } }
After modification, we first execute: /usr/local/nginx/sbin/nginx -t to check whether the configuration is normal. If it displays: the configuration file /usr/local/nginx/conf/nginx.conf syntax is ok configuration If file /usr/local/nginx/conf/nginx.conf test is successful, it is normal. Otherwise, modify the configuration according to the error prompt. The error prompt will be accurate to which line.
Finally execute kill -HUP `cat /usr/local/nginx/logs/nginx.pid` to make the configuration take effect. If your domain name resolution also takes effect, you should be able to access it directly through the top-level domain name.
There are still many uses for reverse proxies. Let’s explore them by ourselves.
Recommended site search: Hong Kong vps host, vps server, Alibaba cloud registration, German server, cloud server vps, registration query, website server, free domain name space, Hong Kong cloud server, independent ip space,


发表评论