Last update at :2024-05-26,Edit by888u
Tutorial: Xshell via SSH Key Connecting to a Linux server (picture)
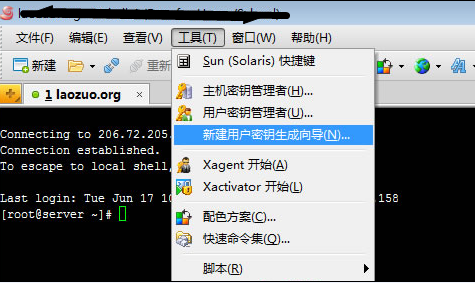
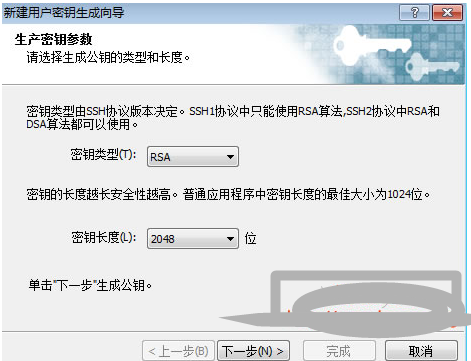
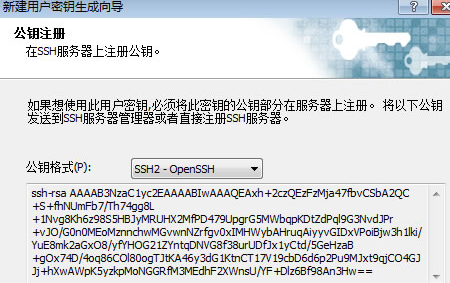
Linux remote software include putty and xshell, both of which are relatively popular. Personally, I prefer putty, maybe because I use it a lot. In fact, xshell is also very powerful, especially it is very safe and convenient to log in with a key. This article mainly introduces Xshell to manage Linux servers through SSH key connection. I have introduced the xsheel software article before, Click here to go directly. The so-called key authentication is to configure a private key and a public key locally, and then transfer the public key to the server you want to connect to, so that you do not need to enter a user name and password. This is like creating a key (private key) and a lock (public key), and this lock can be copied to multiple servers, so that I can open the locks of multiple servers just by using my key. . So, to enable key authentication, the key is to create keys and locks. Step 1: Use Xshell to generate a key We open the familiar XSHELL software, and then go to Tools-New User Key Generation Wizard. When we get to the key parameter interface, we need to select the RSA key type, and the key length can be 1024 or 2048 here. Then click the Next button. Moving on to the next step, we need to encrypt the private key we set up. Click Next to generate the key. Select SSH2-OPENSSH as the public key format. We can copy the public key and save it as a file to complete. Step 2: Upload the public key to the server
A – Upload the laozuo.org.pub public key file we generated to the /root/.ssh folder (if it does not exist, we need to create it), then we need to rename laozuo.org.pub to authorized_keys and use chmod 600 authorized_keys sets permissions. B – Find /etc/ssh/sshd_config and remove the # comment in front of the RSAAuthentication and PubkeyAuthentication lines. C – Restart SSHD service. Debian/Ubuntu execution: /etc/init.d/ssh restart CentOS execution: /etc/init.d/sshd restart Step 3: Configure Xshell to log in using a key Create a new link in Xshell. key-8 Set the user identity to Public Key and select the user key. key-9 Enter the key password we set earlier. We can actually log in at this time, but we need to set permissions. Step 4. Modify the remote server SSHD configuration Similarly, modify the yes after PasswordAuthentication found in the /etc/ssh/sshd_config file to no. Then restart sshd Debian/Ubuntu execution: /etc/init.d/ssh restart CentOS execution: /etc/init.d/sshd restart
IT technology essay: http://wushuaishuai.cn
2) Modify the sshd_config configuration file vim /etc/ssh/sshd_config PubkeyAuthentication yes #Enable announcement key pairing authentication method AuthorizedKeysFile .ssh/authorized_keys #Set PublicKey file path RSAAuthentication yes #Allow RSA keys PasswordAuthentication no Password authentication login is prohibited. If enabled, OpenSSH’s RSA authentication login will be meaningless. 3) Reload the sshd service /etc/init.d/sshd restart 3. The client loads the private key (Private Key) to log in The Linux server that used to use a password to log in now needs to load the private key to log in on the client
Note: Private key, also called user key in Xshell Public key, also called host key in Xshell
Recommended site search: php website space, US attack-proof server, domain name registration center, high-defense US server, how to register company domain name, ICP registration query, 6 yuan per year cloud server, foreign server rental price, foreign domain name, Korean virtual host


发表评论